
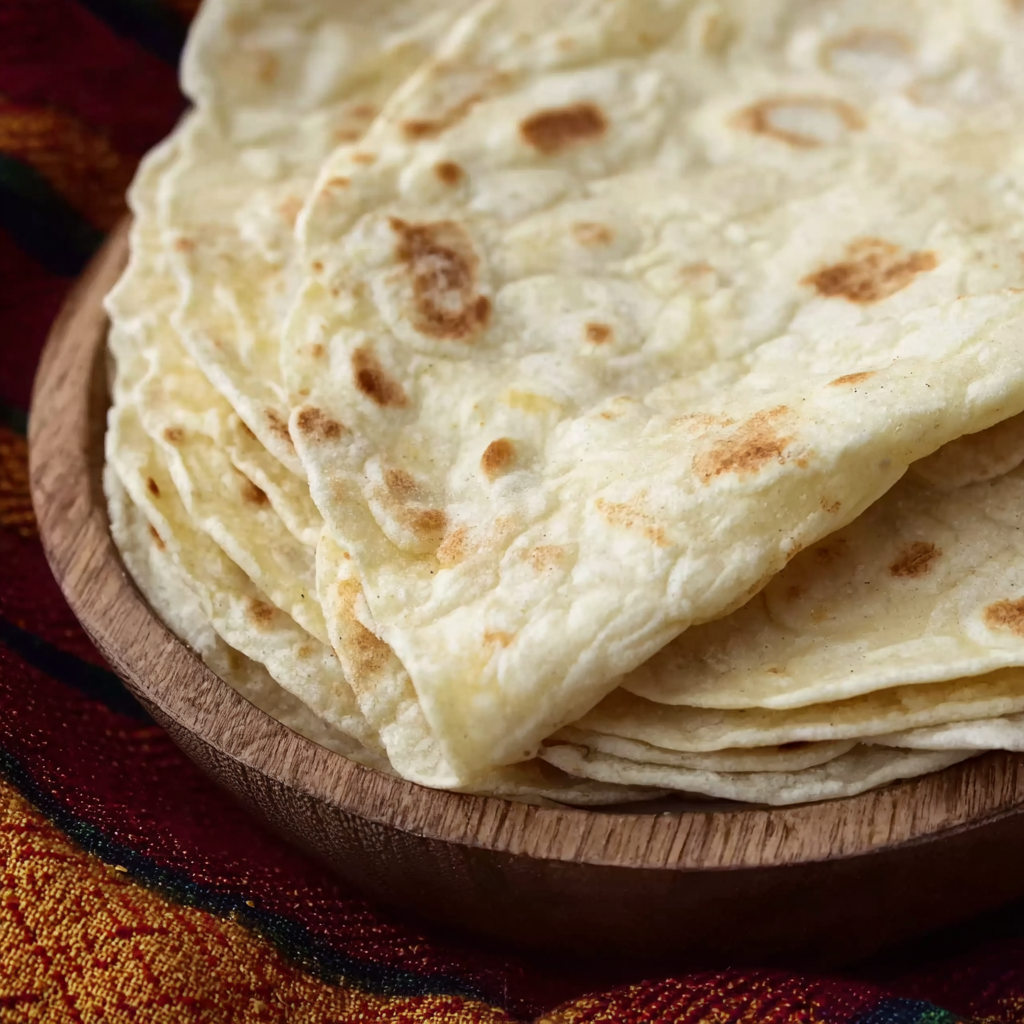
Sourdough Flour Tortillas (made with discard or not)

Thin, tender flour tortillas made with sourdough starter—use discard or active starter for extra flavor. Ready in about 45 minutes and perfect for tacos, burritos, and wraps.
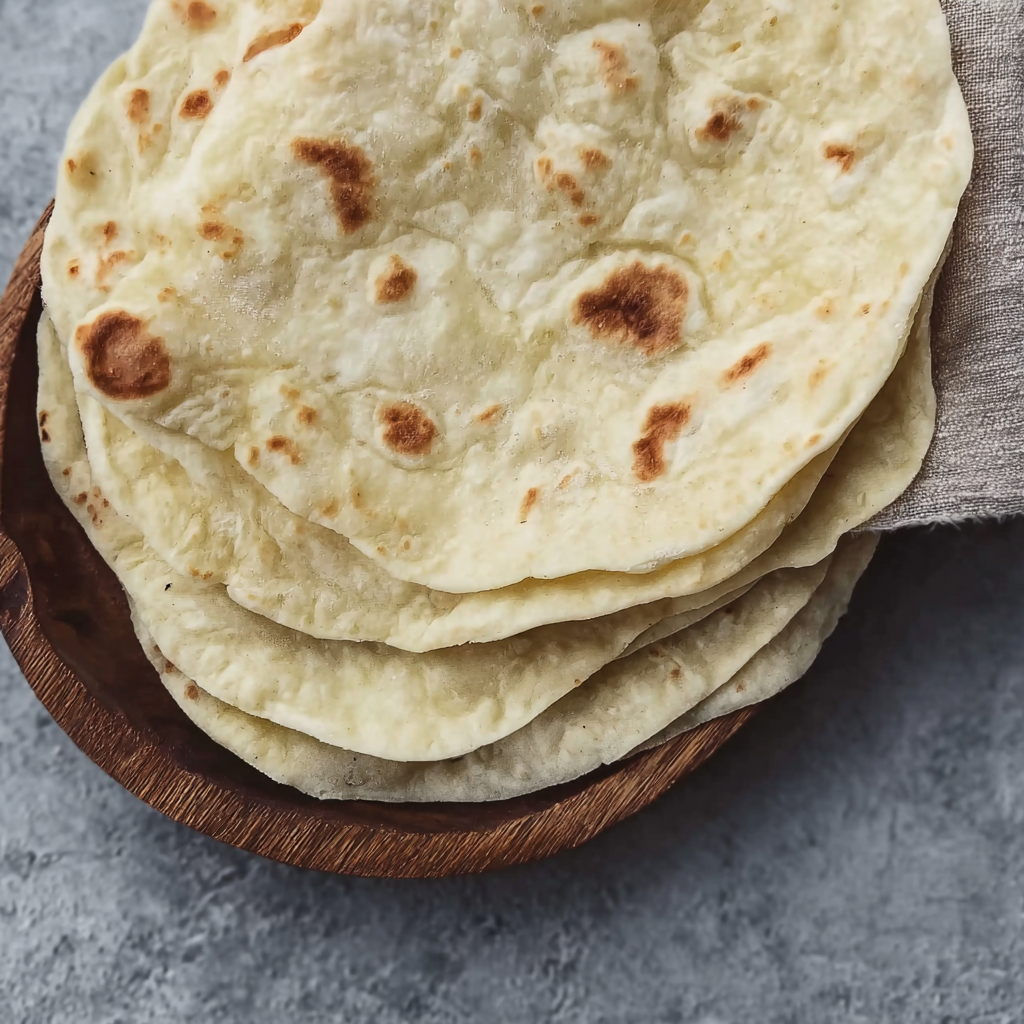
This recipe for sourdough flour tortillas is one of those small kitchen pleasures that quietly upgrades weeknight dinners. I first started making these when I had a surplus of discard and wanted something more interesting than pancakes; the tang of the starter gives the tortillas a subtle depth without making them sour, and the texture becomes pliable and slightly chewy in the best way. They cook quickly, puff where they want to, and develop those little charred spots that scream "homemade."
I adapted this method from a simple flour tortilla formula and added the sourdough element so none of the starter goes to waste. Whether you’re using active starter or discard, the two keys are the same: roll as thinly as you can and get your skillet screaming hot. I love using my Le Creuset crepe pan but a heavy cast-iron skillet works equally well. These tortillas have become my go-to when I want a fresh, fast wrap for leftover roast chicken, beans, or scrambled eggs.
Why You'll Love This Recipe
- Uses sourdough starter or discard, so it’s a great way to reduce waste while adding subtle tang and depth to simple flour tortillas.
- Quick to make—active hands-on time is short and the whole process finishes in about 45 minutes, perfect for busy weeknights.
- Requires pantry staples: unbleached all-purpose flour, butter, salt, water and starter—no specialty ingredients needed.
- Versatile yield: cut into 6 larger tortillas for burritos or 12 smaller ones for tacos and enchiladas.
- Skillet-friendly: works in a nonstick, carbon steel, or cast-iron pan; charring options let you customize the finish.
- Freezes beautifully—make a double batch and freeze layers separated by parchment for up to three months.
I’ve served these at casual family dinners and at a small taco party; guests always notice the delicate texture and slightly nutty, fermented aroma. Personally, I love how they crisp at the edges if left a moment longer on the skillet—my son calls those the "crackle bits." Over time I learned the rhythm of heating the pan and rolling very thin to get consistent puffs and char.
Ingredients
- Unbleached all-purpose flour: Use 1 1/2 heaping cups. I prefer King Arthur or Bob's Red Mill for consistent protein content; higher-protein flours make slightly chewier tortillas, while lower-protein flours give a more tender result.
- Kosher salt: 1 1/4 teaspoons. Diamond Crystal or Morton's both work—if using table salt reduce to about 1 teaspoon because it’s denser.
- Softened butter: 1/4 cup. Butter adds tenderness and flavor; if you want a neutral fat, use vegetable shortening or lard for a more traditional texture.
- Water: 1/3 cup plus 1 tablespoon. Use room temperature water; if your starter is cold from the fridge, warm the water slightly to bring dough to room temperature.
- Sourdough starter: 1/2 cup. You can use active starter or discard. If it’s very runny, spoon out the thicker portion or reduce water a touch—starter hydration affects dough feel.
Instructions
Combine dry ingredients: Whisk together 1 1/2 heaping cups unbleached all-purpose flour and 1 1/4 teaspoons kosher salt in a medium bowl so the salt is evenly distributed. This ensures even seasoning and helps the dough hydrate uniformly. Cut in the butter: Using the back of a fork or a pastry cutter, work 1/4 cup softened butter into the flour until it’s well incorporated and the mixture resembles coarse crumbs. You can use your fingers, but avoid warming the butter too much with your hands to keep the dough tender. Add water and starter: Stir in 1/3 cup plus 1 tablespoon water and 1/2 cup sourdough starter until a shaggy dough forms. Use a spatula initially, then gently knead in the bowl to bring it together into a rough ball; this should take less than a minute. Knead briefly: Turn the dough onto a lightly floured surface and knead 1–2 minutes until smooth and not sticky. You’re aiming for a soft, cohesive ball—over-kneading develops too much gluten and can make the tortillas tough. Divide and rest: Cut the dough into 12 pieces for taco-sized tortillas or 6 for burrito-sized ones. Shape each into a tight ball and cover with a very light towel or plastic. Rest at room temperature 30 minutes up to 2 hours; alternatively refrigerate for up to 24 hours in an airtight container for a slower flavor development. Roll very thin: On a lightly floured surface, roll each ball to about 6–8 inches for tacos or 10–12 inches for burritos—roll until you can almost see the counter through the dough. The thinner you roll, the more flexible and tender the finished tortilla will be. Cook in a hot skillet: Heat a 12-inch nonstick or cast-iron skillet over medium-high heat until piping hot; do not add oil. Place a tortilla in the pan and cook until it puffs and small brown spots appear on the underside, about 30–45 seconds, then flip and cook another 20–30 seconds. Each tortilla takes roughly 60 seconds total. Adjust heat after the first few tortillas to find your preferred char level. Store: Cool slightly, then stack and store in an airtight bag at room temperature up to 5 days or freeze for up to 3 months with parchment between layers for easy separation.
You Must Know
- These hold well at room temperature in an airtight bag for up to 5 days and freeze for up to 3 months; thaw at room temperature or microwave briefly wrapped in a damp towel.
- Using discard versus active starter changes fermentation time slightly but not the cooking method—discard gives milder tang while active starter adds brightness.
- Get the skillet very hot; the first 3–4 tortillas may be paler as the pan comes up to temperature—adjust heat as you go.
- Rolling very thin is more important than exact diameter—the thinner the tortilla, the more pliable and tender it becomes once cooked.
My favorite thing about these is that small adjustments—slightly more water, a little extra rest, or a hotter pan—create very different textures. At one family dinner I made larger burrito-sized rounds and people insisted I never buy store tortillas again. I especially love storing leftovers in the freezer in stacks separated by parchment; a quick reheat in a hot skillet brings them back to life almost perfectly.
Storage Tips
Store cooled tortillas in an airtight, zip-top bag at room temperature for up to five days. For longer storage, stack tortillas with parchment paper between each piece, place them in a freezer-safe bag, remove excess air, and freeze for up to three months. To reheat from frozen, unwrap the number you need and heat in a preheated dry skillet for 15–30 seconds per side, or wrap in a damp paper towel and microwave 20–30 seconds until warm. Avoid prolonged reheating which dries them out; a light mist of water before reheating and wrapping in foil keeps them supple.
Ingredient Substitutions
If you don’t have butter, use 1/4 cup vegetable shortening or 1/4 cup rendered lard for a more traditional, ultra-tender texture. Swap unbleached all-purpose flour for a lower-protein pastry flour for a softer tortilla, though the dough will be stickier and require gentle handling. For a dairy-free version, use plant-based shortening or a neutral oil—reduce oil slightly because liquids change handling. If your starter is very liquid (higher hydration), reduce the water by 1 to 2 tablespoons to avoid a slack dough. These swaps alter flavor and tenderness, so adjust resting time and rolling thickness accordingly.
Serving Suggestions
These rounds are endlessly versatile: fill them with shredded rotisserie chicken, salsa verde and avocado for quick tacos; spoon smoky black beans, rice and pickled onions for vegetarian burritos; or fold around scrambled eggs, cheddar and hot sauce for a hearty breakfast wrap. Garnish with chopped cilantro, a squeeze of lime, or toasted sesame seeds for a visual and flavor lift. For a party, keep finished tortillas warm in a towel-lined basket and set up a topping bar so guests assemble their own—the fresh texture holds up well to rich fillings.
Cultural Background
Flatbreads and tortillas have ancient roots across Mesoamerica and beyond. While corn tortillas are central to many traditional Mexican dishes, flour tortillas emerged and became popular in northern Mexico and the southwestern United States where wheat was more readily available. The addition of fermented starter is not traditional to tortillas, but sourdough has a long history in baking around the world; combining a mild fermentation with wheat flatbreads is a natural way to introduce complexity and a slight chew without altering traditional cooking methods. These tortillas are a modern, practical fusion—honoring simple technique while using contemporary pantry habits like maintaining a starter.
Seasonal Adaptations
In spring and summer, stuff tortillas with grilled vegetables, fresh corn, and herbaceous salsas for a bright, seasonal meal. Autumn pairs well with roasted squash, spiced beans, and pickled shallots for deeper flavors. In winter, use them for warm, hearty wraps with braised meats and melted cheese—adding a touch of chili powder to the dough can give a cozy, warming background note. For holiday batches, fold in finely chopped rosemary or swap water for a little warm milk for richer rounds suited to festive breakfasts.
Meal Prep Tips
Make a double batch and refrigerate or freeze half for quick weeknight meals. Roll all balls and freeze flat, then thaw and cook directly from frozen to reduce active prep time. Portion into stacks of six to eight, separated by parchment and compressed slightly before freezing to save space. Label with date and contents. For grab-and-go breakfasts, warm a tortilla, add scrambled eggs and cheese, wrap tightly in foil, and refrigerate for up to 24 hours; reheat in a 350°F oven for 10–12 minutes or in a skillet for a few minutes until warmed through.
These rounds are forgiving, fast, and flavorful—small technique tweaks reward you with different textures and charring, and they’re an excellent way to use starter without committing to a long fermentation. Make a batch, experiment with thickness and heat, and you’ll quickly find the version your family prefers. Enjoy sharing them around the table.
Pro Tips
Roll each piece as thinly as possible—this creates the best texture and flexibility after cooking.
Heat the skillet thoroughly; the pan needs to be piping hot to get quick puffs and desirable char.
If your starter is high hydration, reduce the added water by 1 to 2 tablespoons to maintain dough consistency.
Use parchment between tortillas when freezing to prevent them from sticking together.
Let dough balls rest uncovered briefly if they feel chilled before rolling; room temperature dough rolls out more easily.
This nourishing sourdough flour tortillas (made with discard or not) recipe is sure to be a staple in your kitchen. Enjoy every moist, high protein slice — it is perfect for breakfast or as a wholesome snack any time.
FAQs about Recipes
Can I use sourdough discard instead of active starter?
Yes. Use discard or active starter; discard gives milder tang, active starter adds brightness. If starter is very liquid, reduce water by 1–2 tablespoons.
How do I store and freeze these tortillas?
Stack tortillas with parchment between them, place in an airtight bag and freeze for up to 3 months. Reheat directly from frozen in a hot skillet for 15–30 seconds per side.
Tags
Sourdough Flour Tortillas (made with discard or not)
This Sourdough Flour Tortillas (made with discard or not) recipe makes perfectly juicy, tender, and flavorful steak every time! Serve with potatoes and a side salad for an unforgettable dinner in under 30 minutes.
Ingredients
Main
Instructions
Combine dry ingredients
Whisk flour and salt in a medium bowl to distribute seasoning and ensure even hydration during mixing.
Cut in the butter
Work softened butter into the flour with a fork or pastry cutter until the mixture resembles coarse crumbs to create tender tortillas.
Add water and starter
Stir in water and sourdough starter until a shaggy dough forms; finish bringing it together with gentle kneads in the bowl.
Knead briefly
Turn onto a floured surface and knead 1–2 minutes until smooth and not sticky; avoid over-kneading to prevent toughness.
Divide and rest
Cut into 6 or 12 pieces depending on size desired, shape into balls, cover lightly and rest 30 minutes to 2 hours or refrigerate up to 24 hours.
Roll thin
Roll each ball very thin—about 6–8 inches for tacos or 10–12 inches for burritos—until almost translucent for the best texture.
Cook on hot skillet
Heat a 12-inch skillet over medium-high until very hot. Cook each tortilla about 30–45 seconds per side until puffed with brown spots; total cooking time ~60 seconds each.
Store properly
Cool slightly, then store in an airtight bag at room temperature up to 5 days or freeze with parchment between layers for up to 3 months.
Last Step: Please leave a rating and comment letting us know how you liked this recipe! This helps our business to thrive and continue providing free, high-quality recipes for you.
Nutrition
Did You Make This?
Leave a comment & rating below or tag
@kitchenfunwithmy3sons on social media!
Categories:
You might also like...

Cinnamon Sugar Cream Cheese Rolls
Buttery pastry envelopes a sweet, creamy cinnamon filling for an irresistible warm dessert or snack—ready in just 30 minutes.
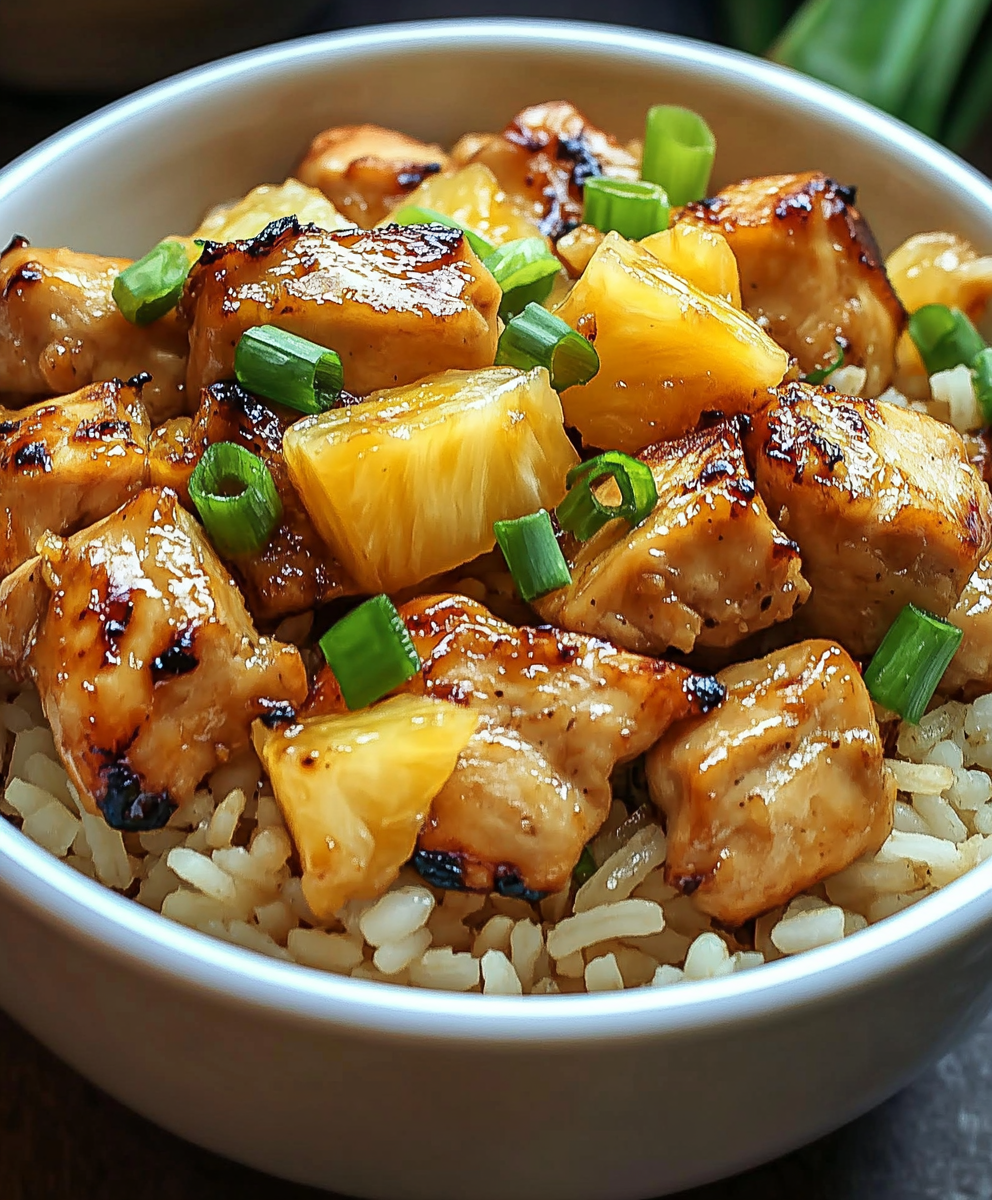
Pineapple Chicken Rice
A bright, one-skillet meal that pairs sweet pineapple with savory chicken and fluffy jasmine rice for an easy, dairy-free weeknight dinner.
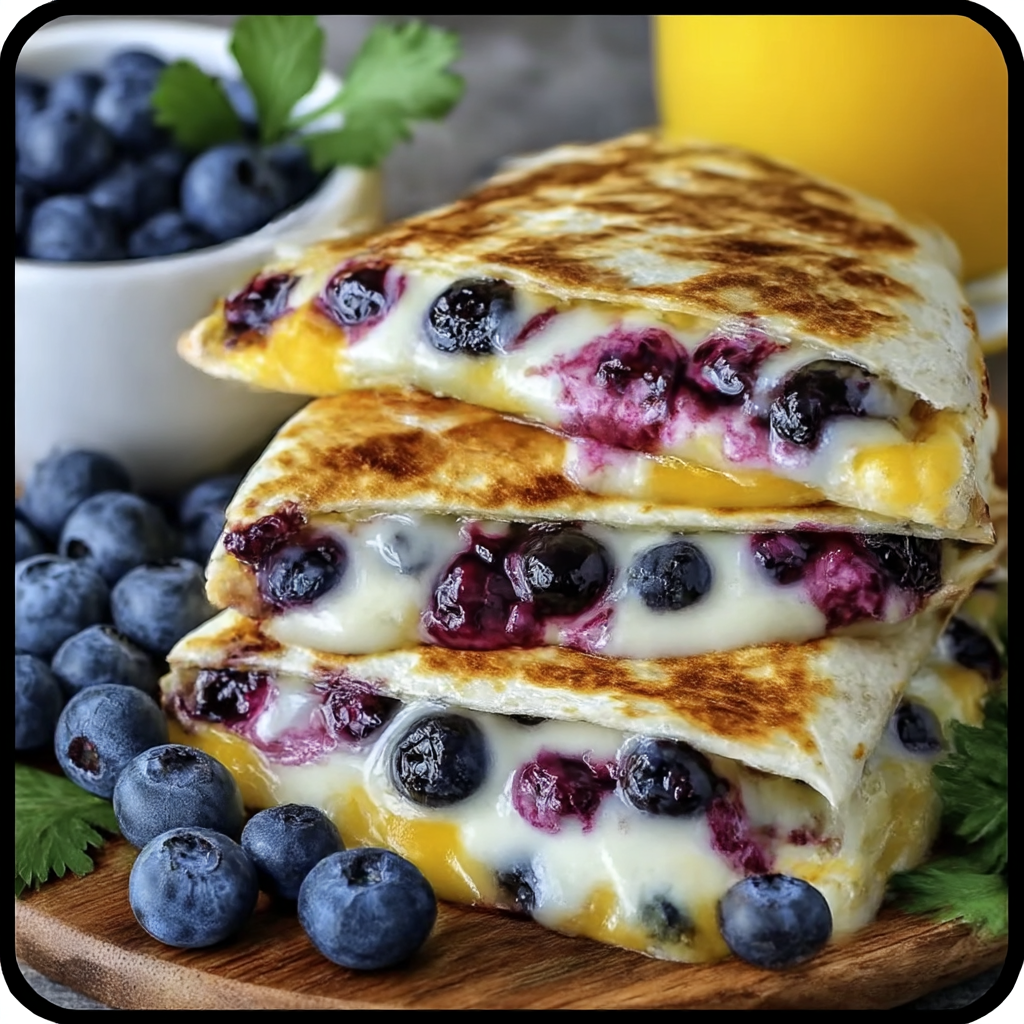
Blueberry Breakfast Quesadilla
Warm tortilla filled with creamy sweetened cream cheese, fresh blueberries and a drizzle of honey—an easy, satisfying morning treat ready in minutes.
Did You Make This?
Leave a comment & rating below or tag @kitchenfunwithmysons on social media!
Rate This Recipe
Share This Recipe
Enjoyed this recipe? Share it with friends and family, and don't forget to leave a review!
Comments (1)
This recipe looks amazing! Can't wait to try it.
Comments are stored locally in your browser. Server comments are displayed alongside your local comments.
Hi, I'm !
What's Popular

Get My 30-Minute Meals email series!
Quick and easy dinner ideas delivered to your inbox.