
Lemon Raspberry No Bake Pie

Bright, creamy, and impossibly simple, this Lemon Raspberry No Bake Pie layers sweet-tart berries with a silky lemon filling for a perfect spring dessert.
This Lemon Raspberry No Bake Pie is my go-to celebration dessert for every arrival of spring. I fell in love with this combination the first time I layered fruit atop a velvety lemon filling and watched the colors pop through a clear glass plate. The tartness of fresh raspberries against the sweet, creamy lemon filling creates a balance that feels both elegant and unfussy. I often make it when I want something showy but simple, and it has become a favorite at brunches, potlucks, and backyard gatherings.
I discovered this version during a weekend when I needed to make dessert fast for a friends and family brunch. The store had beautiful raspberries, and I had a box of instant lemon pudding in the pantry. That first pie disappeared so quickly that I began refining the technique, focusing on texture cues and the best way to layer the berries so every slice looks like a little work of art. The filling ends up silky and light because of folding in whipped topping and the gentle handling that keeps the dessert airy. The recipe delivers on freshness and visual appeal while remaining incredibly easy to assemble.
Why You'll Love This Recipe
- Ready in about 10 minutes of active prep and simply chills for two hours, making it a perfect make-ahead dessert for busy hosts.
- Uses pantry staples like instant pudding mix and a store-bought crust if you want to save time but also shines with homemade components.
- Bright lemon flavor balanced by fresh raspberries makes this a crowd-pleaser for family and guests of all ages.
- Flexible assembly allows for gluten-free crusts or dairy-free swaps when needed without sacrificing texture.
- Great for spring and summer entertaining because it is light, cool, and visually stunning even when sliced thinly.
- Perfect for last-minute entertaining since you can stash it in the refrigerator and finish garnishes just before serving.
In my home the pie has become a staple for any occasion that calls for something floral and fresh. My mother always asks me to bring it to family gatherings because it stores well and people love the bright color. I also learned a few tricks like chilling the crust briefly before assembling and using a deep-dish pie plate to ensure even slices without the filling running.
Ingredients
- Cream cheese: 8 ounces cream cheese at room temperature. Full-fat gives best texture and tang. Soften to room temperature for easy whipping; I prefer Philadelphia brand for consistent results.
- Powdered sugar: 1/2 cup. Confectioners sugar dissolves quickly into cream cheese, keeping the filling silky rather than gritty.
- Instant lemon pudding mix: 3.4 ounces, one standard package. Use instant, not cook-and-serve, for a quick set and the bright lemon flavor.
- Milk: 1 cup of 2 percent or whole milk. Whole milk yields a richer filling; 2 percent keeps it lighter but still creamy.
- Whipped topping: 16 ounces Cool Whip, thawed. Two tubs make folding easy and give a stable finish; you can also use homemade whipped cream if you prefer.
- Lemon: Zest of 1 lemon. Fresh zest lifts the whole dessert; save the lemon for garnish slices if desired.
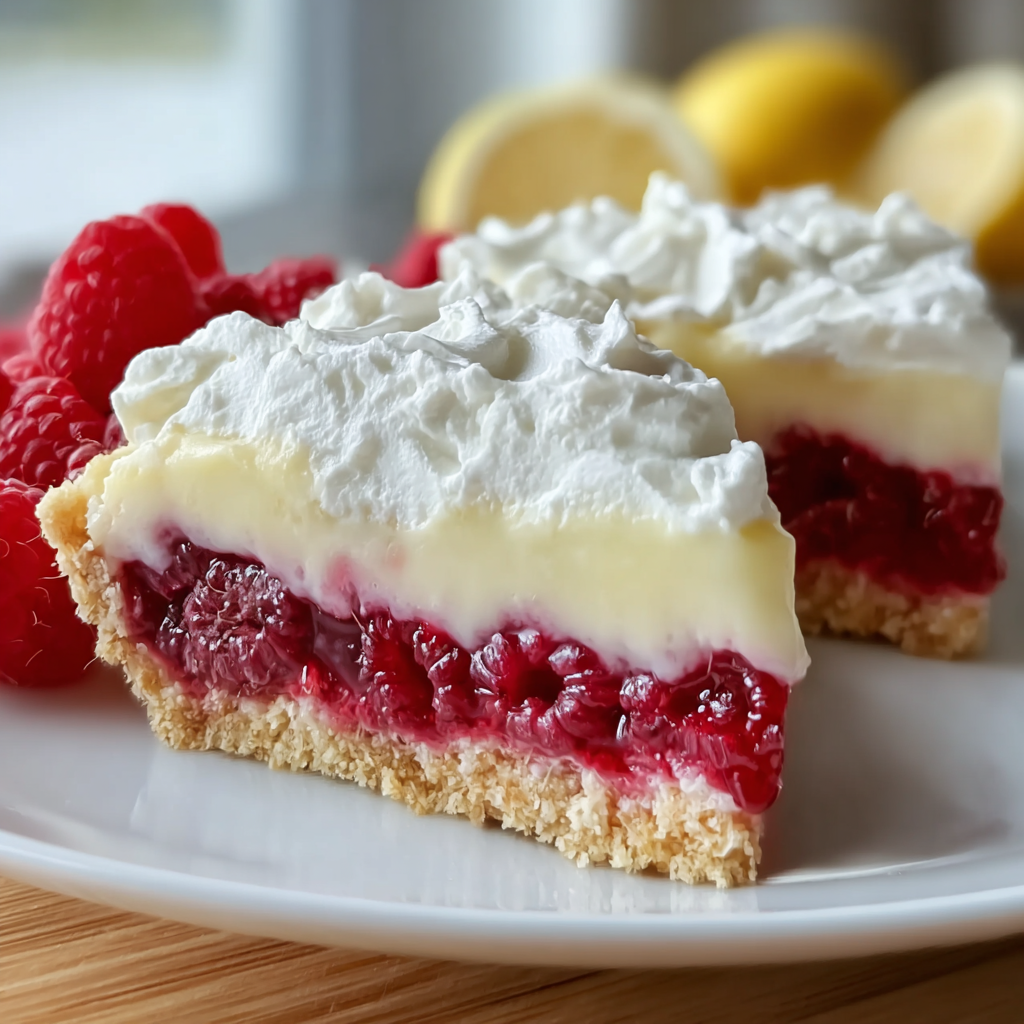
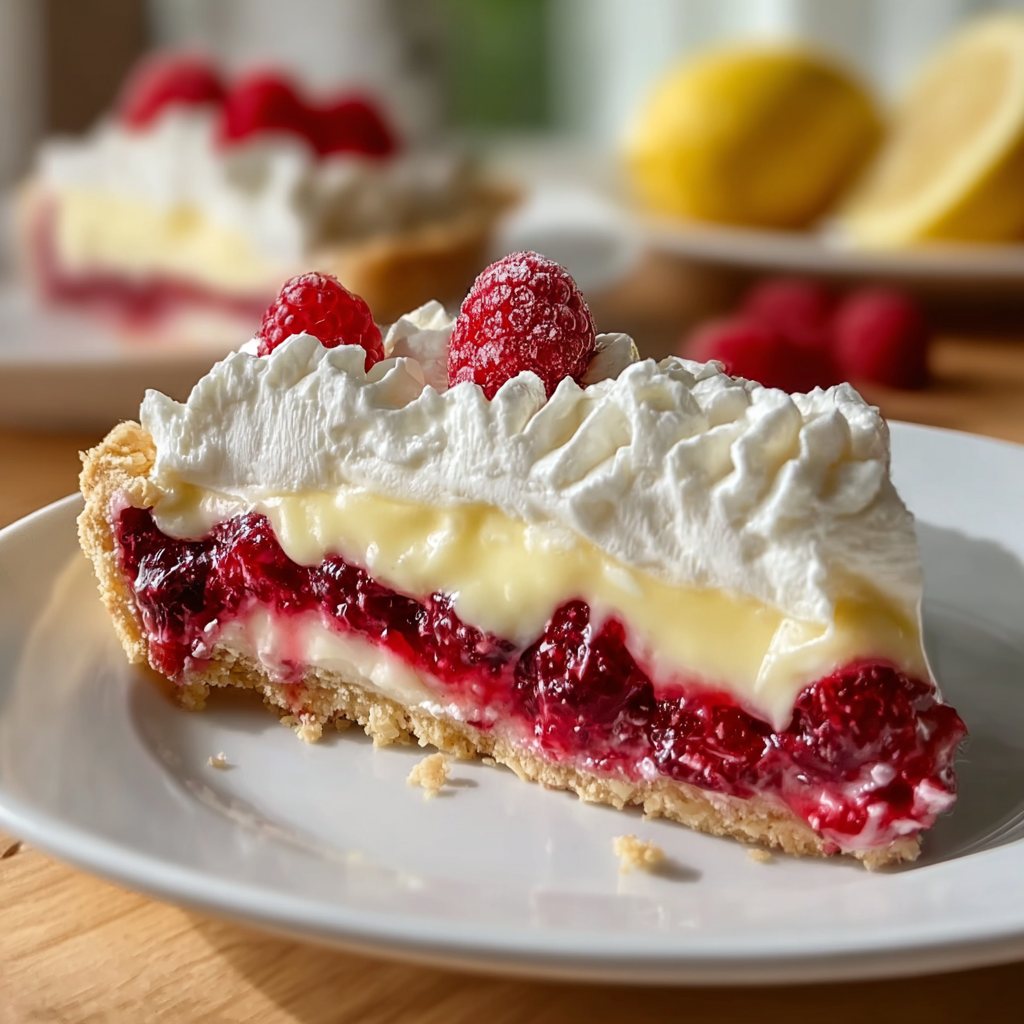
- Pie crust: 1 graham cracker crust, store-bought or homemade. I like a deep-dish crust for generous slices. If using store-bought, check diameter as some are smaller and may need slightly less filling.
- Fresh raspberries: 18 ounces, rinsed and drained, divided. Look for bright, firm berries with no mold. Organic often tastes sweeter and less bitter.
- Mint leaves: For garnish. Choose fresh, crisp leaves to contrast the creamy filling and add aroma.
Instructions
1. Soften and beat the cream cheese: In a large mixing bowl use a hand mixer to beat 8 ounces of room temperature cream cheese with 1/2 cup powdered sugar until completely smooth and free of lumps, about 1 to 2 minutes. Scrape the sides often so no streaks remain. Properly softened cream cheese is key to a lump-free filling and sheen on the surface. 2. Whisk the pudding mix: In a separate bowl, whisk together 1 cup of milk and the 3.4 ounce instant lemon pudding mix until thick, about 2 minutes by hand. The mixture should hold a ribbon when you lift the whisk and be noticeably thicker than milk. This step activates the instant stabilizers so the filling sets quickly during chilling. 3. Combine pudding with cream cheese: Pour the pudding into the beaten cream cheese and mix on medium speed until evenly combined. Stop the mixer and scrape down the bowl to ensure there are no pockets of unmixed ingredients. The mixture should be smooth, glossy, and spreadable. 4. Fold in whipped topping and zest: Fold 8 ounces of the thawed whipped topping into the lemon-cream cheese mixture using a rubber spatula to keep the texture light. Add the lemon zest and fold gently until evenly distributed. Reserve the remaining whipped topping for topping the pie before serving. Overmixing will deflate the aeration you created, so fold with clean, deliberate strokes. 5. Layer raspberries in crust and fill: Arrange 12 ounces of raspberries in an even layer across the bottom of the graham crust, covering it completely so each slice will include whole berries at the base. Pour the lemon filling over the berries and smooth the top with a spatula. The berry layer under the filling keeps berries from floating and creates a beautiful cross section when sliced. 6. Chill until set: Refrigerate the pie for at least 2 hours or until the filling is firm to the touch. Chilling allows the instant pudding to fully set and ensures clean slices. For firmer slices, chill for up to 4 hours or freeze partially before slicing. 7. Garnish and serve: Just before serving, spread the remaining 8 ounces of whipped topping over the chilled filling, top with the remaining raspberries, lemon wedges, and mint leaves. Cut into 8 slices and serve chilled. If slicing frozen, let stand 10 minutes at room temperature for easier serving.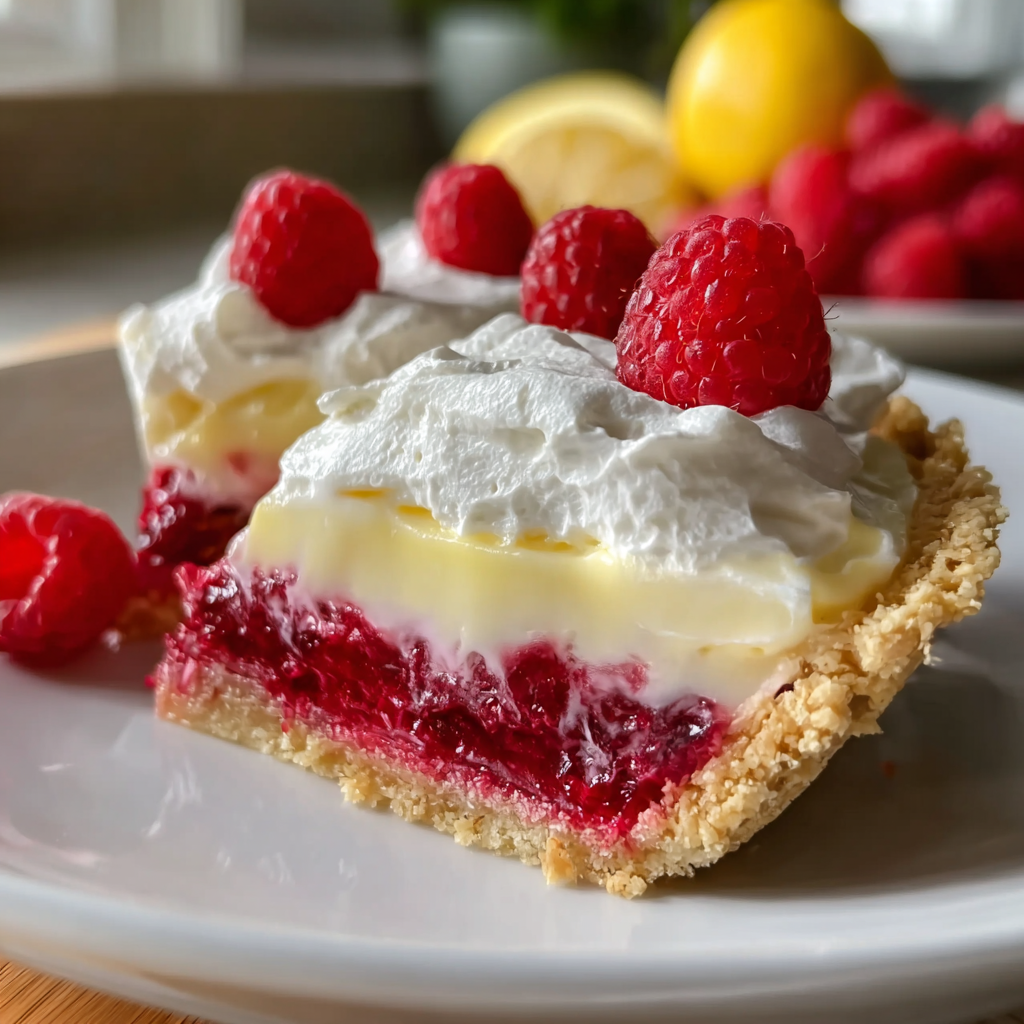
You Must Know
- This dessert keeps well in the refrigerator for up to 1 week when covered in an airtight container, and it freezes well for up to 2 months.
- Using room temperature cream cheese prevents lumps and reduces mixing time, resulting in a smoother texture.
- The layer of raspberries under the filling prevents fruit from sinking and creates an attractive cross section when slicing.
- If you prefer a less sweet finish, choose a reduced-sugar whipped topping or use slightly less powdered sugar in the cream cheese step.
- For neat slices, wipe your knife clean between cuts or chill the pie a bit longer so the filling firms up more.
My favorite part of this dessert is how it looks on the table the moment I lift the pie from the fridge. The bright raspberry red against pale lemon cream draws everyone in. Guests often comment on how light it feels despite being rich in flavor, and I love that the recipe is forgiving enough that even novice bakers can produce a professional-looking result.
Storage Tips
Store leftover slices in an airtight container in the refrigerator for up to one week. To maintain the best texture, place a piece of parchment between layers to prevent sticking. If you plan to freeze, wrap the whole pie tightly in plastic wrap and then foil, or freeze slices individually on a baking sheet before transferring them to a freezer container. Frozen slices will keep up to two months. Thaw overnight in the refrigerator for the best texture, or serve partially frozen for easier slicing. Avoid leaving the pie at room temperature for more than two hours.
Ingredient Substitutions
If you need dairy-free options, swap the cream cheese for a dairy-free cream cheese and use coconut cream whipped topping or a dairy-free whipped alternative. For a gluten-free version, use a gluten-free graham crust or almond flour crust, and ensure your pudding mix is gluten-free. If fresh raspberries are not available, use frozen raspberries thawed and drained well, or substitute thinly sliced strawberries for a sweeter profile. Using homemade whipped cream instead of Cool Whip will give a fresher taste but may reduce shelf life to 2 to 3 days.
Serving Suggestions
Serve this dessert chilled with a sprig of mint and a thin lemon slice for a fresh, professional presentation. Pair it with strong coffee or a light dessert wine for a balanced finish. For brunch, plate a wedge alongside lemon-sugar dusted shortbread cookies or a small scoop of vanilla bean ice cream. The pie also makes a lovely centerpiece for spring holidays on a white cake stand, and individual mini versions can be made in tart pans for parties.
Cultural Background
Layered cream and fruit desserts have roots in many culinary traditions where combining fresh produce with dairy creates celebratory sweets. The use of instant pudding is an American convenience adaptation that became popular in mid century kitchens for its quick set and reliable results. Raspberries and lemon are classic pairings in European desserts for their complementary acidity, and this pie reflects a modern, no-fuss take on those flavors using contemporary grocery staples.
Seasonal Adaptations
In spring and summer use fresh raspberries when they are at peak ripeness for the best flavor and texture. In late winter swap raspberries for thawed frozen berries, and consider adding a teaspoon of lemon curd to the filling for extra tang. For autumn, replace raspberries with warm spiced pear compote layered under the lemon filling or use a gingersnap crust for a cozier spice profile. Small tweaks like these keep the dessert feeling seasonal while using the same straightforward technique.
Meal Prep Tips
Make the filling and berry layer up to a day ahead and keep covered in the refrigerator. Assemble and chill the final pie at least two hours before serving so it sets properly. If bringing the pie to an event, transport chilled in an insulated bag with ice packs. For individual portions, use silicone muffin cups with a graham crust base and fill with the same steps. Those single-serve versions are great for packed lunches and are easier to freeze and reheat individually.
There is something joyful about sharing a dessert that looks like it took hours to make but actually came together in minutes. Try this pie the next time you want to celebrate spring flavors with minimal fuss and maximum wow factor.
Pro Tips
Bring cream cheese to room temperature for smooth blending and fewer lumps.
Layer raspberries across the bottom of the crust to prevent them from floating in the filling.
Chill the pie for at least 2 hours to ensure clean slices and a firm set.
If slicing frozen, let the pie stand 10 minutes at room temperature for easier serving.
Use a serrated knife and a clean towel to wipe the blade between cuts for neat slices.
This nourishing lemon raspberry no bake pie recipe is sure to be a staple in your kitchen. Enjoy every moist, high protein slice — it is perfect for breakfast or as a wholesome snack any time.
Tags
Lemon Raspberry No Bake Pie
This Lemon Raspberry No Bake Pie recipe makes perfectly juicy, tender, and flavorful steak every time! Serve with potatoes and a side salad for an unforgettable dinner in under 30 minutes.
Ingredients
Filling
Crust and Fruit
Instructions
Soften and beat the cream cheese
Beat 8 ounces room temperature cream cheese with 1/2 cup powdered sugar until smooth using a hand mixer. Scrape bowl sides to remove lumps.
Prepare the lemon pudding
Whisk 1 cup milk with one 3.4 ounce package of instant lemon pudding mix until thick, about 2 minutes by hand.
Combine pudding and cream cheese
Pour pudding into the cream cheese and mix until evenly combined, scraping the sides as needed to ensure a smooth filling.
Fold in whipped topping and zest
Fold 8 ounces of whipped topping into the filling to keep it light, then fold in lemon zest. Reserve remaining whipped topping for topping the pie.
Assemble the pie
Spread 12 ounces of raspberries over the bottom of the graham crust, pour the filling over the berries, and smooth the top.
Chill and garnish
Refrigerate at least 2 hours or until set. Top with remaining whipped topping, raspberries, lemon wedges, and mint just before serving.
Last Step: Please leave a rating and comment letting us know how you liked this recipe! This helps our business to thrive and continue providing free, high-quality recipes for you.
Nutrition
Did You Make This?
Leave a comment & rating below or tag
@kitchenfunwithmy3sons on social media!
Categories:
You might also like...

Cinnamon Sugar Cream Cheese Rolls
Buttery pastry envelopes a sweet, creamy cinnamon filling for an irresistible warm dessert or snack—ready in just 30 minutes.

Pineapple Chicken Rice
A bright, one-skillet meal that pairs sweet pineapple with savory chicken and fluffy jasmine rice for an easy, dairy-free weeknight dinner.

Blueberry Breakfast Quesadilla
Warm tortilla filled with creamy sweetened cream cheese, fresh blueberries and a drizzle of honey—an easy, satisfying morning treat ready in minutes.
Did You Make This?
Leave a comment & rating below or tag @kitchenfunwithmysons on social media!
Rate This Recipe
Share This Recipe
Enjoyed this recipe? Share it with friends and family, and don't forget to leave a review!
Comments (1)
This recipe looks amazing! Can't wait to try it.
Comments are stored locally in your browser. Server comments are displayed alongside your local comments.
Hi, I'm !
What's Popular

Get My 30-Minute Meals email series!
Quick and easy dinner ideas delivered to your inbox.